a guide to...
Ground Floor Extensions
01: Introduction
Welcome to Resi’s guide to ground floor extensions!
Over the course of this guide, we’ll walk you through all the extension options open to your home, as well as discussing the nitty gritty of home improvement. This will include: planning permission, Permitted Development rights, building regulations - the whole admin rainbow.
Alongside this, we’ll inspire you to get the most out of your ground-floor space. We'll demonstrate the possibilities this classic extension can offer to your home, from adding a study, expanding your kitchen, to even treating your food loving soul to a pantry.
Resi helps thousands of homeowners extend each year. It’s our belief that every home deserves great design, the kind only an architectural designer can bring. That’s why we’re sharing our experience with you, so you can go into your project with eyes wide open, confident in the journey ahead.
And on that note, let’s get started!
“ Resi helps hundreds of homeowners expand each year. It’s our belief that every home deserves great design, the kind only an architectural designer can bring. ”
02: Why choose a ground floor extension?
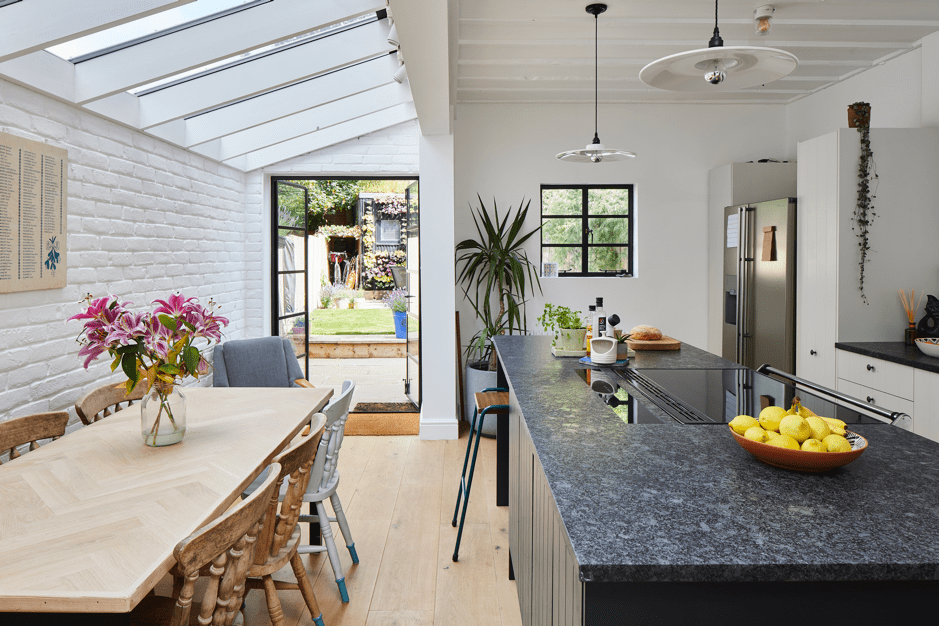
There are many ways to expand your home, but who can resist the classic that is the ground floor extension?
Ground floor extensions have a wonderful ability to transform the spaces you use most, such as the kitchen and living area. It’s in this area of the home that we spend the majority of our time, cuddling on the couch, or entertaining friends and family. On top of this, they’re so versatile in both design and costs, that nearly every home can benefit from this form of extension.
Why extend your home?
More space
Brings in more natural light
Better access to your garden
Add extra rooms
Increases the value of your home
Allows you to stay in the area you love
Benefits of a ground floor extension:
They're versatile, going as big or small as you desire
There are options for budgets of all sizes
Can benefit from Permitted Development rights
Perfect for open-plan living
Most professionals have experience dealing with them, giving you more options
03: Choosing your ground floor extension
So you’ve decided to expand your home, but which type of extension is going to be right for your home?
When it comes to expanding your ground floor there are several choices for homeowners, each with their own pros and cons. They vary not only in size, but in price, and the property type they suit best. Picking the right extension for your home is one of the biggest decisions you'll make, so let's make sure you get it right.
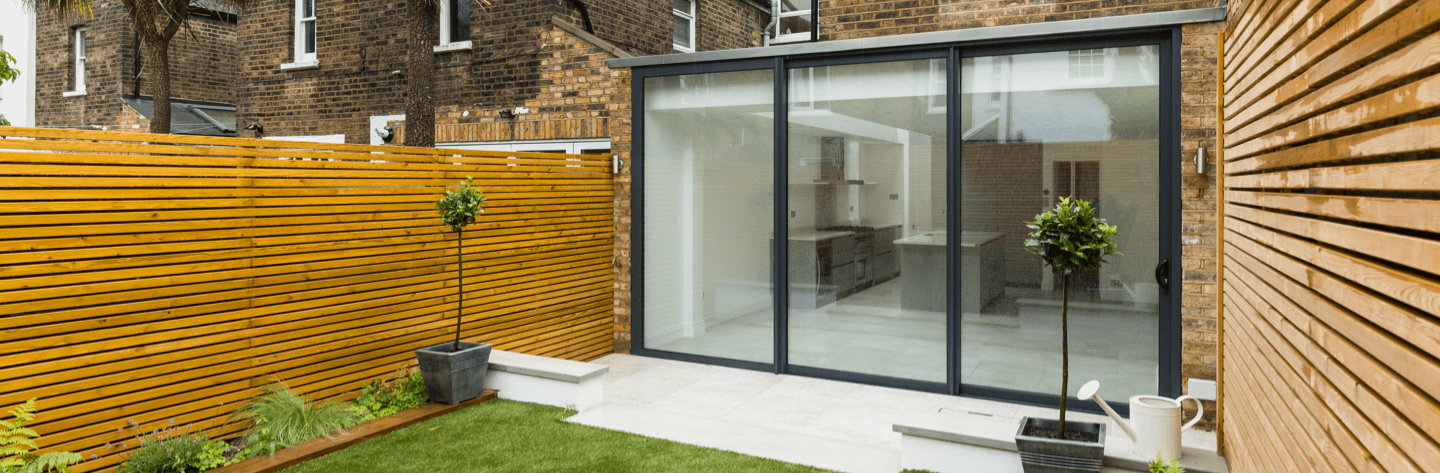
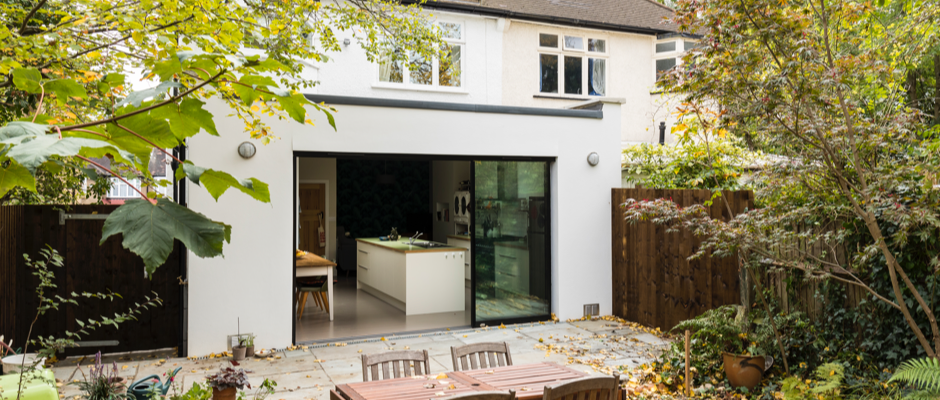
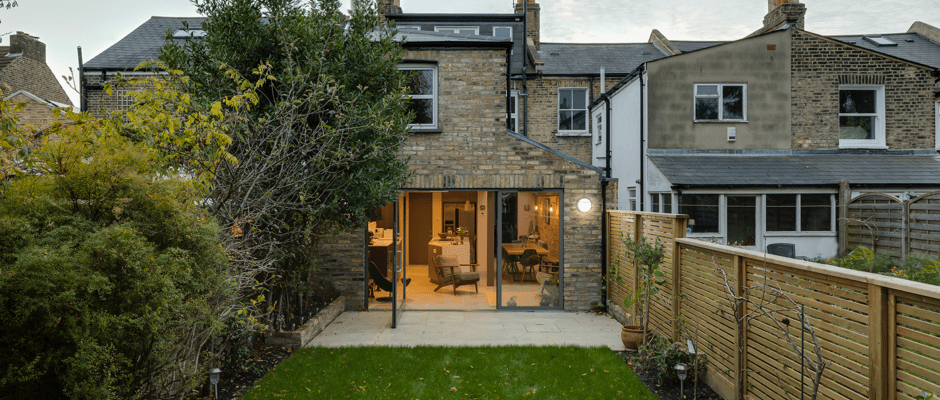
Ground Floor Rear Extension
Ground Floor Rear Extension
The rear extension is a classic. By taking the back of your home out into the garden you can generate whole new rooms, as well as opening up the interior of the building, and connecting the existing areas.
Pros
Their simple design helps keep costs low, and the architectural process straightforward. By being one of the most popular extensions in the UK, finding experienced professionals should be a breeze.
Cons
Because you’re moving your home out into your garden, you’re inevitably going to loose green space. This can be a worthy sacrifice, if you’ve got garden to spare, but in areas where they’re at a premium, losing this space can actually bring down your home’s value.
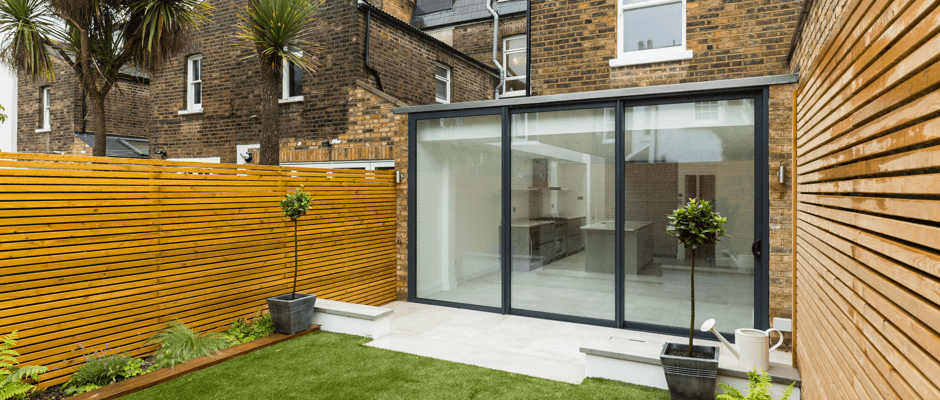
Ground Floor Side Return
Ground Floor Side Return
The small but mighty option. To look at, a side return extension isn’t a huge add on to your property, but with the right design you’ll be amazed at what they can achieve.
Side returns bring your property out into any alleyways present next to the building. They’re often added onto period properties, especially those dating from the Victorian era, and are a popular choice for town houses in UK cities.
Pros
Because they’re using dead alleyway space, you don’t have to sacrifice any of your oh so desirable garden in order to expand your home.
Cons
Naturally, you’ll need space at the side of your home for this extension to be possible. They also tend to be more expensive than rear extensions, as they’re a slightly more complicated project. You’ll also need to make sure no light is lost, if you’re closing off any doors or windows by extending into your side space.
Ground Floor Wraparound
Ground Floor Wraparound
If size is your thing, then you can’t go wrong with a wraparound extension. They’re the ultimate in home transformation, bringing your property out both to the rear and the sides.
Pros
By squaring off space around your home, you won’t have to sacrifice as much of your garden as you would with a rear for the same amount of space. They also allow designers to get more creative when it comes to adding more square footage in dense city areas - a popular option in London.
Cons
As a big project, they naturally require a big budget. Bigger than most other extensions. Not only will design fees be higher, they’ll require more time from other professionals, such as contractors and structural engineers.
04: Planning Permission or Permitted Development?
Before you can even think about building, you must first secure approval from your local authority. This can come in two forms: planning permission or by utilising your Permitted Development rights.
What are Permitted Development rights?
Permitted development rights allow homeowners to extend their home without the need for planning permission. The scheme was set up by the government, and they can only be used if your extension follows a strict set of guidelines.
You’re usually within Permitted Development rights if your single storey extension or conservatory...
Sits to the side (as long as this will not face a highway) or rear of the house (not the front)
Does not extend beyond the rear wall of the existing house by 3m if an attached house or 4m if detached
Uses similar building materials to the existing house
Takes up less than 50% of the size of the land around the original house (“original” being the latest of when the property was built or if it was built before 1948, then as it stood on 1st July 1948)
If a side extension is less than 50% of the width of the original house
Is less than 4m in height (or less than 3m if within 2m of a property boundary)
Has eaves and a ridge that are no taller than the existing house
To name just a few of the requirements!
Because extensions using Permitted Development rights have to navigate so much regulation, it’s worthwhile getting an architectural designer on board who has extensive experience in dealing with this type of planning.

Does every home benefit from Permitted Development rights?
Unfortunately not.
Permitted development rights do not cover...
Flats
Maisonettes
Listed buildings
Homes within conservation areas
If you wish to extend any of these properties, you’ll need to apply for planning permission.
Permitted development rights & certification
If you do plan on using your Permitted Development rights to extend, it’s recommended that you apply for a lawful development certificate. This certificate proves your build was approved by your local authority prior to construction and therefore is proof your extension was added on legally. This not only protects you in the event the rules around Permitted Development change, but is also a desirable piece of documentation for future buyers.
The application for a lawful development certificate is similar to a planning application - though much less likely to face rejection. You’ll need to provide:
An application form
Evidence verifying the information within the application (including architectural plans and elevations)
A site location plan
A fee
You can either manage this process yourself, or have an architectural designer or other professional act as your planning agent to do it on your behalf. This process typically takes 8 weeks, and should be undertaken prior to works commencing to fully protect yourselves.

Applying for planning permission
If you plan on building outside of your Permitted Development rights - either because they don’t cover your home, or you want to go beyond what they permit - then you’ll need to apply for planning permission.
All requests for planning permission are handled by your local authority, and will take, at minimum, 8 weeks to be reviewed. You’ll need to supply the same information as you would with a lawful development certificate, and afterwards you’ll be given a planning officer to review the proposal.
Decisions are based on a number of considerations, which can include (but are not limited to):
Design and appearance
Proposed materials
Overlooking/impact on neighbours' privacy
Overshadowing/impact on neighbours' access to light
Layout
Parking
Waste disposal
Traffic
Noise
Previous planning decisions
Nature conservation
Historical significance
Layout and density of building
Once your design has been reviewed for all these details, you’ll then be notified of your planning officer’s decision. You’ll either be given a straightforward yes or no, or you’ll be given a set of conditions that your plans must include in order to go ahead. Sometimes the planning officer will provide their thoughts during the consultation process, although they are not obligated to do so.
As with Permitted Development, because of the complex legalities of planning permission, it’s worthwhile employing a professional to manage this process on your behalf. One of the benefits of having an architectural designer act as your planning agent is that they’ll be able to quickly amend your plans, if a planning officer recommends a small tweak will get you approval first time round. Of course, this does rely on you getting a nice planning officer in the first place.
What happens if my planning application is rejected?
First things first, don’t panic. This doesn’t mean your project won’t happen, nor does it have to mean extensive fees in getting this overturned.
If permission is denied outright, your planning agent can advise on next steps. If you don’t have a planning agent in your corner, you can also employ a planning consultant. This is recommended if you plan on making an appeal, which can be a drawn out and costly process - not something you want to enter into lightly.
The other route to take is to re-apply with updated planning drawings. The redesign should take into consideration the reasons for refusal and look to counter these. The council offer a free resubmission service, as long as this is undertaken within 12 months of the decision of your first application.
05: How much will it cost?
Ground floor extensions typically cost between £1,200 and £1,500 per m2 - though this can go up to £2,000 m2 in London and the South East. You also have to consider the areas to be refurbished as a result of the works.
This roughly translates to around £30,000 - £50,000 for a 5m x 5m2 extension, but this doesn’t include those luxury touches, such as glazed roofs, bi-fold doors, kitchens and more. In fact, your budget can vary wildly depending on a number of home factors and personal decisions.
Where your money will be going…
Architectural Design - 2%
Administration fees - 1%
Structural Engineers - 4%
Surveyors - 3%
Contractors - 30%
Materials - 30%
Fittings - 10%
Glazing - 20%
What can affect your budget:
Your location will have a big impact on the price of your contractors. Professionals in the North of England are significantly cheaper than those working in London.
The size of your extension is a natural consideration when it comes to cost, along with the uniqueness of its design. The longer you want your architectural designer to spend drawing, the more costly the fees.
Legal fees can also quickly add up if a party wall dispute arises. This happens when you try to build on a wall/boundary that you share with a neighbour, excavating within 3 metres or making changes to a shared wall. Legally you must serve them notice of your construction intentions, and if they don’t give approval then it is likely that an award will need to be prepared which can cost anywhere from £800.00 - £1,500.00 +. This typically involves hiring a party wall surveyor, and you’ll need to cover both yours and your neighbours fees.
Glazing is a costly material, so the more glass you incorporate into your design, the bigger your budget will have to be. There are many glazing options to choose from - double/triple glazed, solar control, heated - and while they might feel like an extravagance, some of these specifications will save you money in the long run. Double/triple glazing keeps heating bills down, while solar control can stop your extension from turning into a sauna in summer. With glass, it pays to invest.
Structural work is very specialised, and has to be done right in order to gain building regulations approval from your local authority. For this reason, the more complex your structure, the more expensive your extension will be as a whole. The most expensive structural work usually works in tandem with glazing - floating corners, glass roofs, floor to ceiling glazing. It sometimes requires the need for structural glass, and as we discussed in the last point, specialised glazing is an expensive material.
You’ll also need to keep an eye on the political climate too! Brexit might not seem like something that relates to extensions, but inflation can quickly push up the price of your materials. It also puts a strain on contractors too, an industry driven by migration labour. The fewer professionals around, the higher the costs!
06: How much value can a ground floor extension add?
When trying to work out how much value an extension might add, there are two main factors to consider: size and location.
Just as property prices grow and shrink across the UK, so too does the worth of home extensions. Here’s what you can find across the country…
Region |
House Price (/m2) |
Value added by 15m2 extension |
|---|---|---|
| North East | £1,597 | £23,955 |
| East Midlands | £1,941 | £29,115 |
| Yorkshire & The Humber | £2,049 | £30,735 |
| West Midlands | £2,189 | £32,835 |
| South East | £4,079 | £61,185 |
| Central London | £8,323 | £124,845 |
| Wales | £2,018 | £30,270 |
| England | £4,105 | £61,575 |
| England & Wales | £4,045 | £60,675 |
Of course, size and location aren’t the only considerations for future buyers. There are other factors that can impact on the price of your home, such as:
Added functional space
How you use your added space can make a big difference in house price. Have you simply extended existing space, such as the kitchen, or have you added on new rooms? Flat and bungalow owners might consider adding on a new bedroom, while others might consider the addition of a utility room or ground floor WC.
Substance over style
There’s always a temptation to try and cut costs when it comes to construction, but beware the downsides of this! Getting a quality build should be your number one priority, as anything less can seriously damage the value of your home. No one wants to be dealing with shoddy builder mistakes, nor live with an extension that doesn’t match the quality of the main building.
Ceiling prices
Ceiling prices send a cold shiver up the spine of anyone looking to add value to their home. If your area is affected by a ceiling price, it means that no matter how much improvement you undertake, your home is unlikely to exceed a certain price point on the market. This can be a nightmare if you’ve just invested a large amount of money into a pricey extension. For this reason, we highly recommend researching the house prices in your area before you commit to extending.
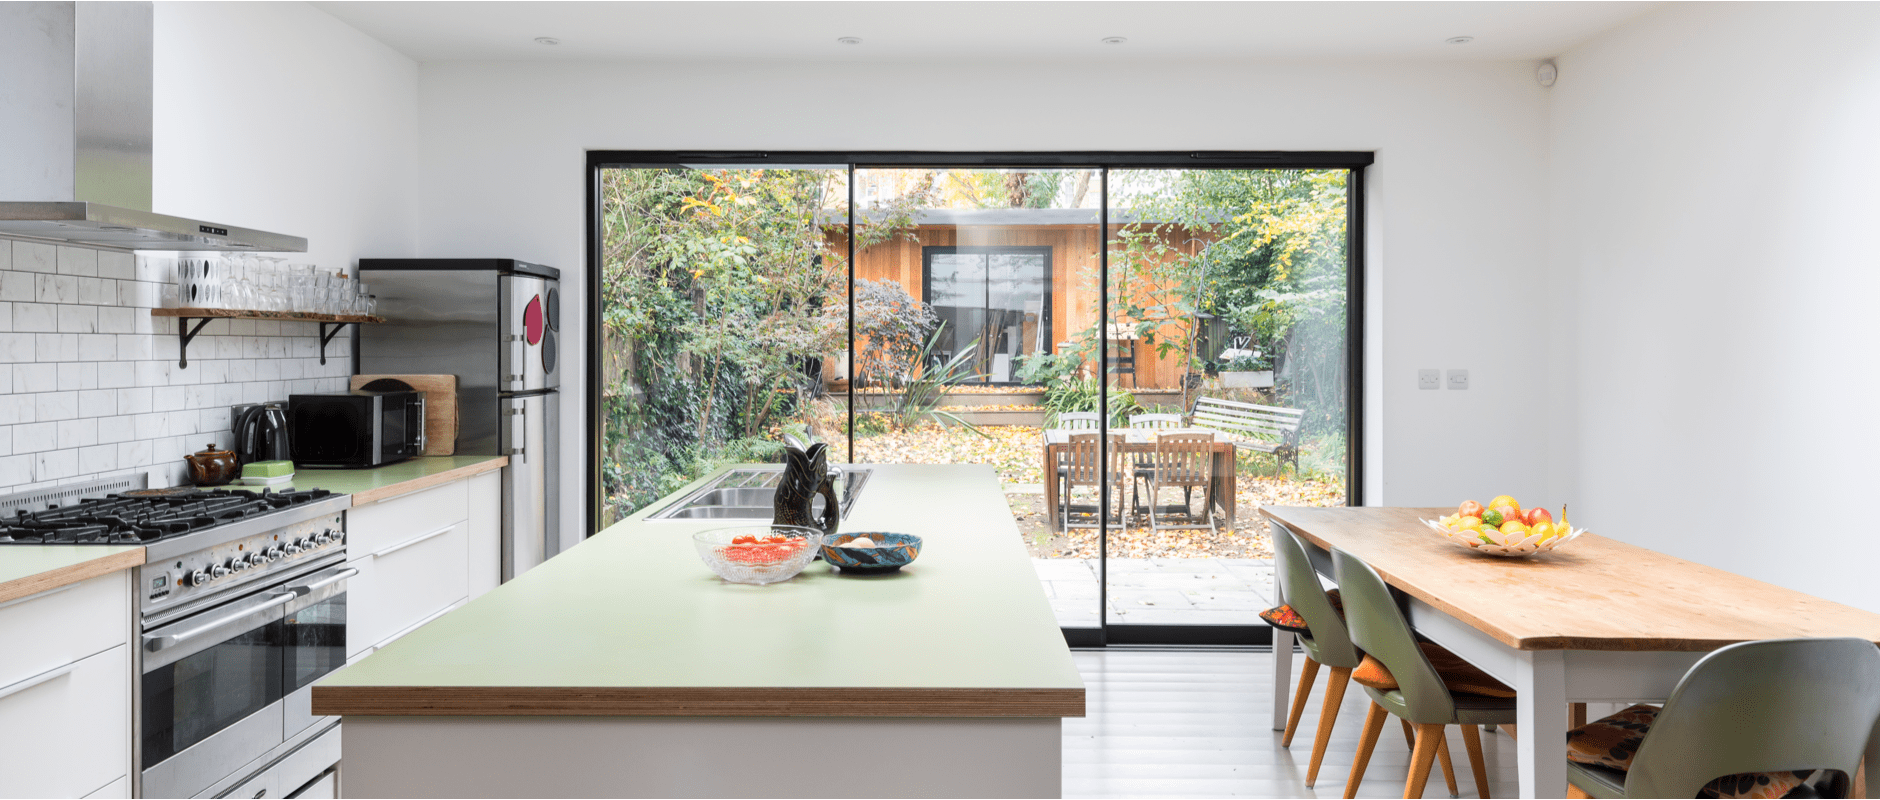
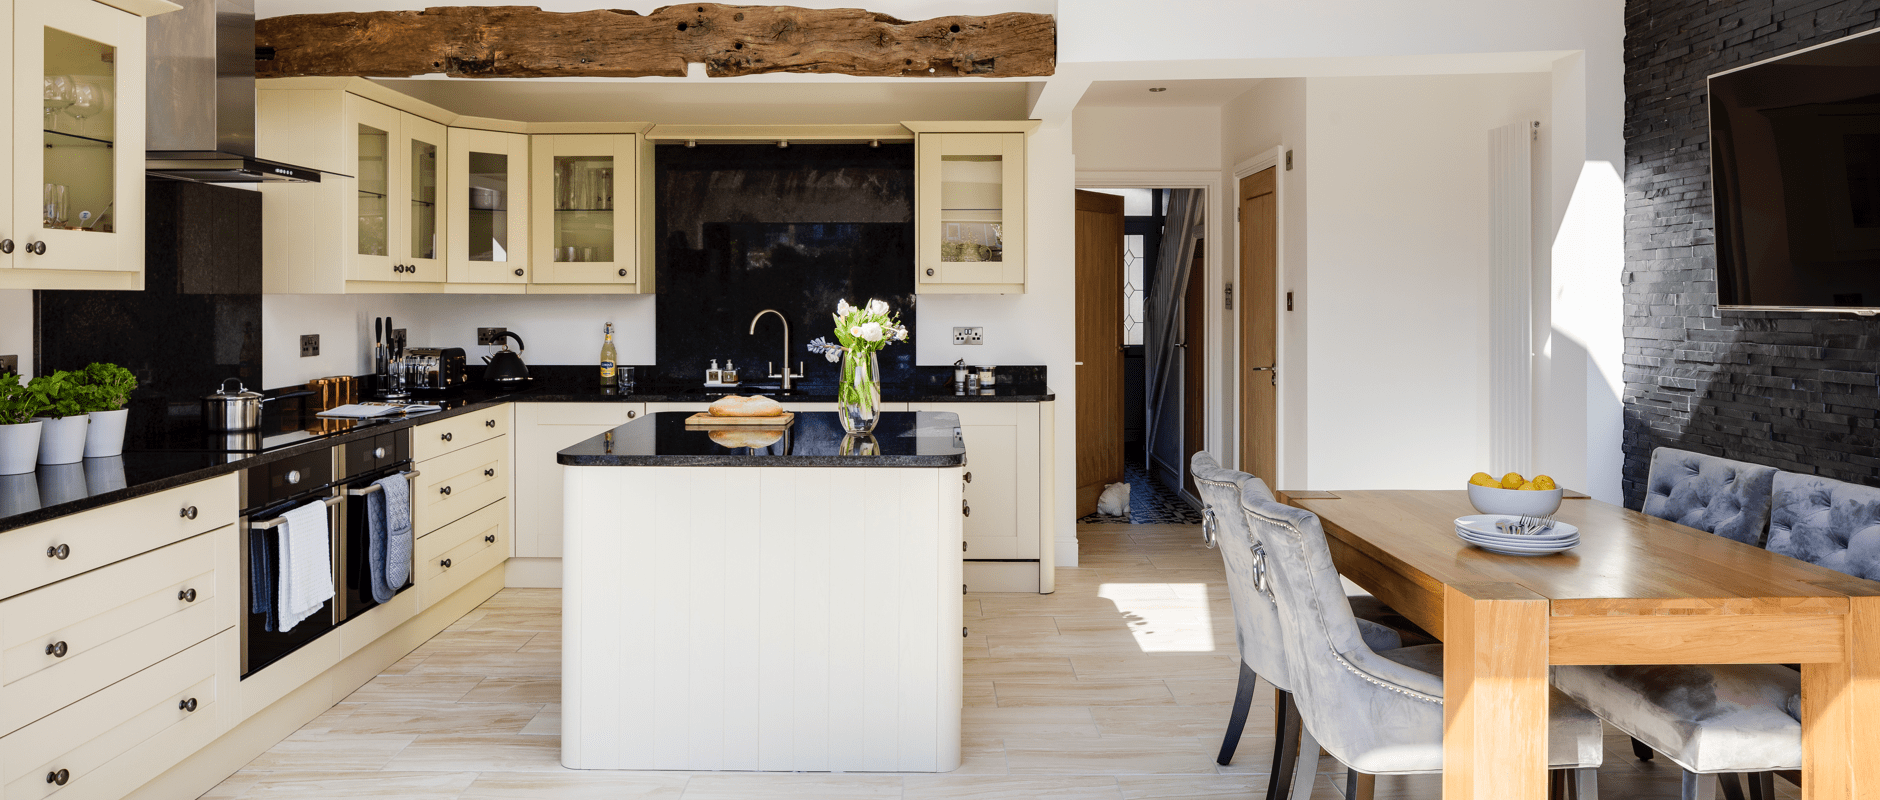
07: Making your extension stand out
Looking to give your extension the WOW factor? Avoid wasting your money on pricey fads and consider this timeless classic. Not only will these features help your extension stand out from the crowd, they can also increase your house price!
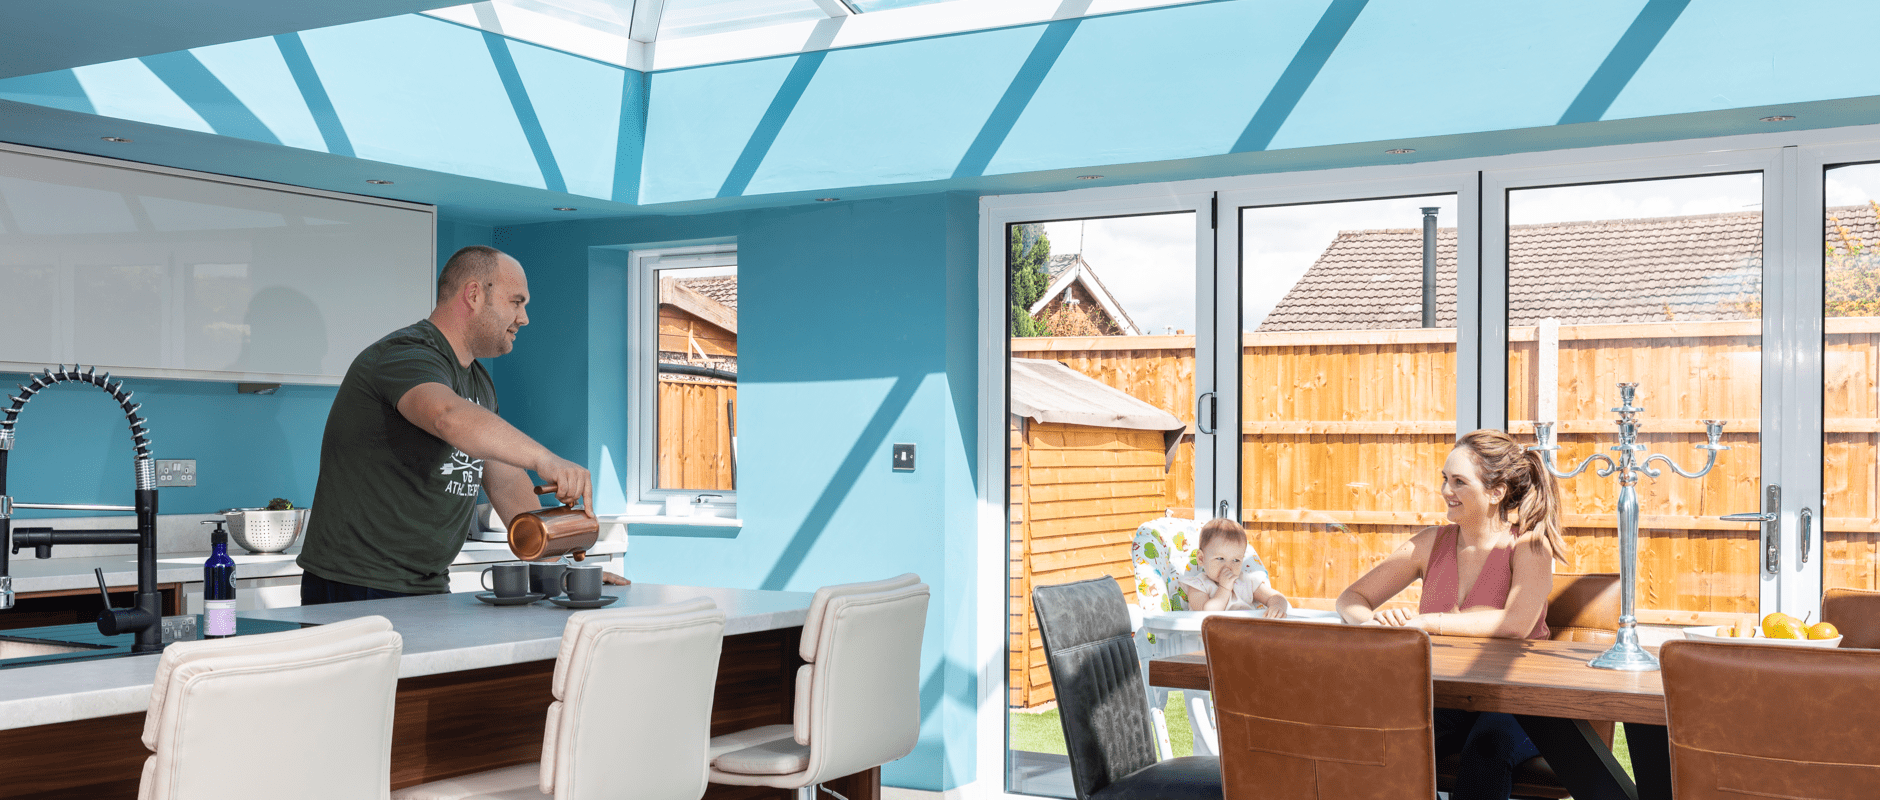
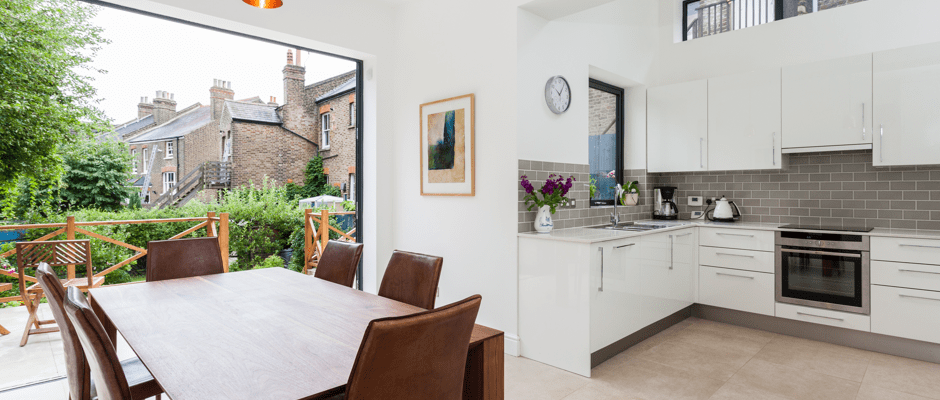
Glass roof
Skylights
Bi fold doors
Crittal doors
Floor to ceiling glazing
Exposed brick wall
Landscaping
08: How to build a ground floor extension
When it comes to actually building your project, you’ve got quite a journey set out in front of you. You’ll need to factor in not only construction, but the design and planning phase of your project. For many homeowners, juggling all these elements can feel daunting. That’s why we’ve made it our mission to make it easier than ever to get building.
With the right professionals by your side, your journey to a new home should look something like this…
Measuring your home
You’ll need to provide or create a set of drawings to show how your home stands today. This can be done through commissioning a measured survey.
Design
Working with an architectural designer, you’ll create the proposed floor plans and elevations of what your future space will look like - you might even opt to have some 3D models made!
Check your drains
It’s important that you make sure your proposed design doesn’t affect any local sewers by getting a CCTV Drainage survey. If your extension is near or over any important pipes, you’ll need to arrange a build over agreement with your local water board.
Planning
When your designs are ready these can be packaged up for your local authority to review and offer approval. Either through planning permission, or by securing a lawful development certificate.
Party wall
If you have neighbours that will be affected by your extension, you’ll need to serve notice of your intentions to build on a party wall. They’ll need to give approval, otherwise you’ll need to negotiate a party wall agreement.
Building regulations
With approval in the bag, your planning drawings will need to expand to include technical details that meet UK building regulations. You’ll then need approval from your local building control, which includes site visits to inspect the works as they are being completed.
Tendering
The process of getting quotes from different contractors, and agreeing on timelines and payment plans. The drawings created in the building regulation phase will help prospective contractors put together more accurate prices.
Construction
Once you’ve got your contractor in place, building can finally begin. This will then be followed by quality control, whereby the work is checked by either yourself or a professional - such as an architectural designer or structural engineer.
Fit out
Finally, it’s time for the finishing touches. This means adding in your fittings, such as a new kitchen or floors, and creating the interior design. Once happy, you can give final sign off and enjoy!

09: Picking the right professionals
Choosing the right professionals is a crucial part of building an extension. Pick the right one and you not only end up with a quality result, but can avoid costly delays and construction headaches. However, one bad pick can take you from dream project to housing nightmare.
So how do you avoid disaster? Here are our top tips…
General rules for hiring
Whether you’re looking for an architectural designer or structural engineer, here are some basic things you should bear in mind when hiring for your project:
Shop around
As with many purchases, you should never settle for the first good deal that comes your way. We recommend approaching at least three professionals for quotes, to get a good comparison.
Check references
If possible, talk to the company’s previous clients. This is very important when it comes to contractors. Make sure at the very least you can have a phone call with a past client, without the contractor present. Or, even better, visit a home to check the work for yourself. Ideally, this home would have been completed at least a year ago, so you can see how the contractor’s work has stood the test of time. If a contractor won’t put you in contact with old customers, take this as a major red flag and stay clear.
Experience
When looking over the company’s previous work, ask yourself whether any of it reflects your home. You want a professional that has plenty of experience in your kind of project and with your type of home. The more experience they have, the less likely they are to make mistakes.
Team size
How many people work for the company you’re considering? Small teams can be tempting, as they usually offer smaller fees, yet there is a downside to these businesses. In the case of architectural design firms, practices with only one or two designers can easily get overwhelmed, should one of their clients run into troubles. Even if your project runs smoothly, their divided attention can mean your home faces delays. Bigger teams are not only less likely to be affected by hiccups - they also have more experience thanks to the number of projects they handle and the varied set of skills within the business.
Industry connections
How well established a professional or business is in the industry can have some big perks for your home. Well connected companies will be able to connect you to trusted professionals they’ve worked with in the past, and could even grab you better deals through their recommendations.

Picking the right contractor
Choosing the right contractor for your project is vital to safeguarding your home and preventing running into financial risks or bad practices. Here are some factors to take into consideration when selecting yours:
Has your builder got FMB accreditation?
The FMB, also known as The Federation of Master Builders, is an accreditation that builders can apply and get approved for. By having this, the builder has to, in theory, follow a set of conduct guidelines that help protect UK homeowners from poor practices. At Resi, we support the FMB and would encourage you to consider a professional who boasts this qualification.
However, the FMB isn’t perfect. Contractors have to pay a fee in order to say they’re part of the federation. On the one hand, it’s an encouraging sign that a builder is willing to front this cost, but on the other, it does make the FMB a business. This means the FMB, in our opinion, doesn’t go far enough in the guidelines their builders have to follow, such as forcing their members to have the proper insurance in place to protect their clients' finances.
In an ideal world, all professionals wishing to be hired as a contractor would have a qualification or license to do so, but until that day arrives, the FMB is the next best thing.
Protect against builders going bust
Google the biggest construction disasters, and chances are you'll see the same thing popping up again and again - builders going bust. Why is this so common? Because even though a contractor declares bankruptcy, some companies will simply change their names and place another director at the helm, making it look like a brand new, debt-free business. To make sure you don’t fall foul of this, it’s worth getting your project covered by Developer Insolvency Insurance. Ask the builder if they provide this, and if not, you can take it out yourself.
Another option is pay your project on credit card. Under Section 75 of the Consumer Credit Act, your bank has to look into compensating your loss if a service or goods are not delivered to you after payment. In order to qualify, you’ll need to pay more than £100 and less than £30,000. A good option for smaller construction projects.
Know what payment plan keeps you safe
Setting up the right payment plan is one of the best things you can do for protecting your project. Remember: never pay upfront for a builder’s services. A good contractor will have the funds to upfront the costs of the project, and get that money back when various stages of the works have been completed. Those who need payment upfront are at risk of going bust and should be avoided.
Our recommended way of structuring pay is to find a builder who will fund the project, and then pay them based on valuations. In this scenario, you would give them a deposit to get started, then the contractor will work for an agreed amount of time, at which point you’ll get a contract administrator (typically your designer, though if you know your stuff, you could act as your own) to assess the work that has been done, and a payment will be released. This encourages your contractor to keep to a schedule, and provide work of a high standard.
Another way to do it would be to get a JCT homeowners contract. These allow you to pay your contractor in stages, rather than big lump sums. However, the danger with this is tied to your own knowledge of the construction industry. Without a professional there to check the work, or to advise on timings, you might end up paying money at the wrong time and for work that’s not of a good quality.
If you have the money to spare, one way to keep your whole build on time and within budget is to hire a Project Manager. However, having a Project Manager can be expensive, so you’ll have to work out if this is an expense you're willing to pay in order to give your construction security.
10: Conclusion
And there you go, your ultimate guide to ground floor extensions. We hope you’re now brimming with ideas for your own home. Maybe you’re considering an extension? If this is the case, Resi is the perfect place to start your home transformation journey.
Copyright © 2022 Resi Design Ltd.
Resi Design Ltd. trading as 'Resi' | Company No: 10471125
We are proud to employ architects registered with the Architects Registration Board and were awarded the mark for The Mayor's Good Work Standard for fair pay & conditions, wellbeing, skills, progression, diversity and recruitment.